


MLOps in Practice — Machine Learning (ML) model deployment patterns (Part 1)
Machine Learning (ML) model serving and deployment is one of the most critical components of any solid ML solution architecture. This article specifically talks about the ML model deployment scenarios

In my previous article, MLOps in Practice — De-constructing an ML Solution Architecture into 10 components, we walked through the 10 critical components to build an end-to-end ML system. One of the 10 components is model serving and deployment.
Generally speaking, deploying an ML model to a production environment refers the process of getting data to be ingested by a model to compute predictions. This process requires a model, an interpreter for the execution, and input data.
However, depending on:
The manner the ML models will be consumed, and
How quickly the predictions of the ML models need to be available,
there could be different ways to deploy the ML model in a production environment. ML model deployment can be categorized into the 2 major patterns.
Online (real-time) model deployment — ML models are normally packaged either as REST API endpoints or self-contained Docker images with the REST API endpoints. With online model deployment, the trained ML model makes predictions in real-time, meaning, as soon as the API endpoint is called, a model prediction result will be returned. This can be useful in applications such as recommendation systems or fraud detection.
Offline (batch) model deployment — ML models are used to directly score files. With offline model deployment, the trained models are called and fed with a batch of data at a certain interval (such as once per day or once per week depending on how the models are used in certain business contexts), to periodically generate predictions for use.
Within each of the two above major patterns, there are also different sub patterns that will be discussed in detail in today’s article.

Pre-requisites
Before we start discussing the model deployment patterns in detail, I have a trained ML model, registered in a model registry and ready to be deployed. This model is built in an sklearn flavor and used to predict wine quality. For illustration and demo purpose, below is the key information of the model, including model purpose, model flavor, model algorithm, model input schema, model output schema, model registry location, model stage and model owner. We will use this model for demonstrating the deployment patterns.
{"model_purpose" : "predicts the quality of wine using wine attributes","model_flavor" : ["python_function","sklearn"],
# The python_function model flavor serves as a default model interface for MLflow Python models.
# Any MLflow Python model is expected to be loadable as a python_function model.
# This enables other MLflow tools to work with any python model regardless of
# which persistence module or framework was used to produce the model."model_algorithm" : "sklearn.linear_model.ElasticNet",{"model_signature" :
"model_input_schema":[
{"name": "fixed acidity", "type": "string"},
{"name": "volatile acidity", "type": "string"},
{"name": "citric acid", "type": "string"},
{"name": "residual sugar", "type": "string"},
{"name": "chlorides", "type": "string"},
{"name": "free sulfur dioxide", "type": "string"},
{"name": "total sulfur dioxide", "type": "string"},
{"name": "density", "type": "string"},
{"name": "pH", "type": "string"},
{"name": "sulphates", "type": "string"},
{"name": "alcohol", "type": "string"}],"model_output_schema" [
{"type": "tensor", "tensor-spec": {"dtype": "float64", "shape": [-1]}}
]
},"model_registry_location" : "runs:/<RUN_ID>/<MODEL_NAME>",
# If you are using mlflow to manage the lifecycle of your models,
# the model is loggged as an artifact in the current run using MLflow Tracking"model_stage" : "Production",
# With mlflow, you can transition a registered model to one of the stages:
# Staging, Production or Archived.
# In the demo of this article, the model is alreay transitioned to the "production" stage."model_owner" : "<MODEL_OWNER_EMAIL/MODEL_OWNER_GROUP_EMAIL>"}Now let’s get started! We will first talk about online model deployment patterns.
Online Model Deployment
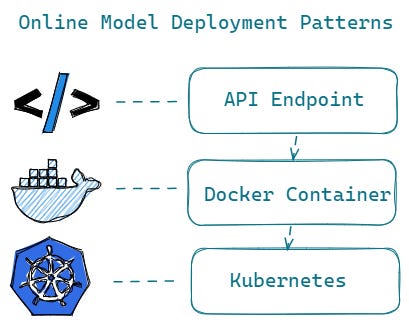
API Endpoints
Online model deployment starts with wrapping the trained model as an API endpoint, serving as an entry position for people / applications to use the model for predictions.
You can build an API endpoint yourself, by leveraging some open source libraries, such as FastAPI, which is a general web framework for building API endpoints. Because FastAPI is easy to learn and offers high performance, lots of data scientists and ML engineers leverage it to build a prediction endpoints to serve their ML models.
Other than FastAPI as a general web framework, there are also several other open sources packages such as MLflow , MLserver and Triton, that specifically provide functionalities to package your trained models as API endpoints.
For example, with MLflow built-in model deployment modules, you can deploy ML models locally as REST API endpoints leveraging MLflow command lines like Mlflow models serve, which deploys the model as a REST API endpoint in a local server.
Similarly, MLserver offers an open source inference server for ML models. With MLserver, you can serve your ML models through both a REST and gRPC interface.
Triton Inference Server is also an open source inference serving software. It is more focused on deploying deep learning models, such as audio/video streaming inferences.
Below is a sample implementation code of deploying the above-mentioned ML model using MLserver. You can do similar implementation with mlflow and Triton as well.
To serve the model using MLserver, two configuration files need to be defined:
settings.json: holds the configuration of the server including server name, server host, server ports, root path, logging settings and so onmodel-settings.json: holds the configuration of the model including model input and output metadata, model inference runtime, model artifact directory and so on.
%%writefile settings.json
{
    "server_name" : "Name of the server",
    "root_path" : "the root_path for applications submounted below a given URL path",
    "host" : "Host where to listen for connections",
    "http_port" : "Port where to listen for HTTP / REST connections",
    "grpc_port" : "Port where to listen for gRPC connections",
    "grpc_max_message_length" : "Maximum length (i.e. size) of gRPC payloads",
    "parallel_workers" : "When parallel inference is enabled, number of workers to run inference across",
    "model_repository_root" : "Root of the model repository, where MLserver will search for models",
    "metrics_endpoint" : "Endpoint used to expose Prometheus metrics. Alternatively, can be set to None to disable it",
    "metrics_port" : "Port used to expose metrics endpoint",
    "logging_settings" : "Path to logging config file or dictionary configuration"
}
%%writefile model-settings.json
{
"name" : "mnist-svm",
"inputs" : "Metadata about the inputs accepted by the model",
"outputs" : "Metadata about the outputs returned by the model",
"implementation": "Python path to the inference runtime to use to serve this model (e.g. mlserver_sklearn.SKLearnModel)",
"platform" : "Framework used to train and serialise the model (e.g. sklearn)",
"versions" : "Versions of dependencies used to train the model (e.g. sklearn/0.20.1)",
"parameters": {
"uri": "URI where the model artifacts can be found. This path must be either absolute or relative to where MLServer is running",
"version": "Version of the model"
}
}Once the configuration files are in place, you can start the server by running mlserver start ., which will generate an endpoint to send inference requests to. This command needs to either be run from the same directory where the config files are, or pointing to the folder where they are.
mlserver start .Once you have built an API endpoint for your ML model, the next step is to think about how you plan to deploy this endpoint.
For scenarios:
Where there are no stringent requirements on scoring latency, scoring throughput, prediction service availability as well as prediction service dependency, and
Where you just need to prototype a ML driven software,
you can serve your ML models just as API endpoints in a single server.
However, for business critical situations requiring having extremely high Service Level Agreements (SLA’s) for your ML prediction services, containerization becomes the de-facto standard for delivery. In the next part, we will see how containerization works and how you can build Docker images with the REST API endpoints.
Containerization — Docker Container
As ML model inference is generally considered stateless, lightweight, and idempotent, it is quite natural to package the whole ML tech stack (dependencies) and the code for ML model prediction into a Docker container.
As you know, Docker can build images automatically by reading the instructions from a Dockerfile. A Dockerfile is a text document that contains all the commands a user could call on the command line to assemble an image.
Below is a sample Dockerfile for packaging a ML inference API endpoint into a docker image for your reference:
A Dockerfile must begin with a FROM instruction. The FROM instruction specifies the Parent Image from which you are building.
The RUN instruction will execute any commands in a new layer on top of the current image and commit the results. The resulting committed image will be used for the next step in the Dockerfile.
There can only be one CMD instruction in a Dockerfile. The main purpose of a CMD is to provide defaults for an executing container. Do not confuse RUN with CMD. RUN actually runs a command and commits the result; CMD does not execute anything at build time, but specifies the intended command for the image.
The USER instruction sets the user name. The specified user is used for RUN instructions and at runtime, runs the relevant ENTRYPOINT and CMD commands.
/app is the directory of where the API endpoint of the trained ML model is stored.
FROM python:3.8.13-slim-buster as builderRUN mkdir /app && mkdir /model
RUN groupadd -r mymodel && useradd -r -s /bin/false -g mymodel mymodel
WORKDIR /app#Copy dependency lists & artifacts
COPY . /app
COPY ./requirements_api.txt /tmp/requirements_api.txt
COPY ./ml_artifacts/model/requirements.txt /tmp/requirements_model.txt
COPY ./ml_artifacts/model /model
RUN chown -R mymodel:mymodel /app && chown -R mymodel:mymodel /model
RUN pip install --no-cache-dir --upgrade -r /tmp/requirements_api.txt \
&& pip install --no-cache-dir -r /tmp/requirements_model.txt#Runtime
FROM builder as prod
USER mymodel
WORKDIR /appCMD ["uvicorn", "app.main:app", "--host", "0.0.0.0", "--port", "8080"]If you are not comfortable with creating Dockerfile and building your own Docker images, you can leverage the above mentioned open source libraries, such as mlflow and mlserver, to do so. They all have command lines that assist you to create Dockerfile and build Docker images. For example, mlserver has a command `mlserver build [OPTIONS] FOLDER` to build a Docker image for a custom mlserver runtime and a command `mlserver dockerfile [OPTIONS] FOLDER` to generate a Dockerfile.
Once your model is packaged as Docker images with the API endpoint, the docker images can be used to deploy the model to various environments such as Kubernetes, which provides orchestration services to manage, scale, and maintain containerized applications.
Orchestrate and scale containerized ML applications
Tools to manage, scale, and maintain containerized applications are called orchestrators, and the most common examples of these are Kubernetes and Docker Swarm.
Kubernetes, (also known as K8s), is an open-source system for automating deployment, scaling, and management of containerized applications. Public cloud services providers (AWS, Azure and GCP) all have managed Kubernetes services. For example, AWS has both Amazon Elastic Kubernetes Service (EKS) and Amazon Elastic Container Service (Amazon ECS), Azure has Azure Kubernetes Service (AKS) and GCP has
Google Kubernetes Engine (GKE).
Increasingly, Kubernetes is playing an important role in the evolution of machine learning. Containerized development and deployment is becoming an important element for deploying machine learning models. Machine learning models can be easily scaled and scheduled when containerized, and the management of workload performance can be automated as well.
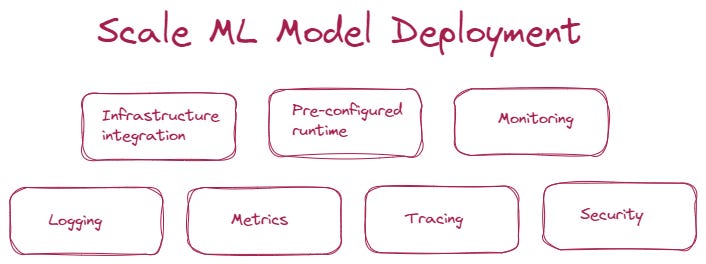
Kubernetes is particularly leveraged when you need to scale your ML prediction services. Additionally, when you need to manage large scale deployment of machine learning models, you also need take the following aspects into consideration:
Infrastructure integration — Integrate with underlying Kubernetes infrastructure, including AWS EKS, Azure AKS, Google GKE, Openshift and so on.
Pre-configured runtime — Pre-package a runtime server with popular ML frameworks, including Sklearn, Tensorflow, Pytorch, XGBoost and more.
Monitoring — System, data and model monitoring to give data scientists, ML engineers and system engineers the opportunities to track the performance of their models over time, detect and diagnose issues, and take corrective action before they cause major problems in a production environments.
If you are interested in learning more about the monitoring ML driven applications, you can refer to my other article — Have you ever monitored your ML driven systems?Logging — Log model input and output requests and send these logs to platforms like Elasticsearch for further search and analysis
Metrics — Integrate with monitoring solutions like Prometheus and Grafana, to capture system metrics.
Tracing — Enable tracing to obtain insights on latency and performance across each microservice-hop.
Security — Put in place security and update policies to avoid common vulnerabilities and exposures.
There are a couple of open source libraries that provide frameworks for deploying ML models at large scale. One is Seldon core and the other is BentoML. Both of them support deploying the ML models into a Kubernetes environment and provide functionalities to assist large scale ML model deployment.
Below is a sample implementation of deploying a trained SKLearn model using Seldon core. Assume you already had an SKLearn model saved as a pickle file. Seldon core expects that your model has been saved using joblib, and it named as model.joblib.
The inference graph is as follows:
apiVersion: machinelearning.seldon.io/v1alpha2
kind: SeldonDeployment
metadata:
  name: sklearn
spec:
  name: wine-quality
  predictors:
  - graph:
      children: []
      implementation: SKLEARN_SERVER
      modelUri: gs://seldon-models/v1.16.0-dev/sklearn/wine-quality
      name: classifier
    name: default
    replicas: 1
Once you have created the above inference graph as a JSON or YAML Seldon Deployment resource, you can deploy to Kubernetes with kubectl as follows:
kubectl apply -f my_ml_deployment.yamlOnce the deployment to Kubernetes is done, you can get model predictions using the following sample codes:
from seldon_core.seldon_client import SeldonClientsc = SeldonClient(
deployment_name="my_ml_deployment",
namespace="seldon",
gateway_endpoint="localhost:8003",
gateway="ambassador",
)r = sc.predict(transport="rest")
assert r.success == True
print(r)This is an extremely simplified version of deploying an ML model to a Kubernetes environment using Seldon core. In future articles, I will definitely deep dive into the whole picture of large-scale ML model deployment, including various deployment techniques, A/B testing, rollout strategies, troubleshooting and so on. If these topics interest you, please feel free to follow me on Medium so that you can get notified when these articles get published.
This concludes the discussions on online model deployment.
Summary
In the beginning of this article, I talked about the fact that there are 2 major categories of model deployment, one is online (real-time) model deployment and the other is offline (batch) model deployment.
So far we have only covered online model deployment patterns including:
Wrapping an ML model into an API endpoint,
Containerizing an ML model as a Docker image with the API endpoint
Orchestrating and scaling containerized ML applications by leveraging Kubernetes
There will be another article on offline (batch) model deployment very soon. Please feel free to subscribe if you want to get notified when this article gets published.
Thanks so much for your support!
References